
Top 10 Professional Photography Techniques
With today’s blog entry you’ll be able to experiment beyond the basics for we’re going to bring together top 10 professional photo techniques used by sophisticated masters of image capturing. The following guidelines are intended to help picture-takers immediately enrich their photography store of knowledge and improve the works to create photography websites with stunning showcases. They’ll be able to read a description of each photo technique and view a respective set of photos from across the spectrum of subjects and styles. Note, there are two more high-end photo effects we highlighted before on our blog – that’s actually amazing Long Exposure and Tilt-Shift Photography. But right now learn to take great pictures with advanced digital photography top-rating techniques.
High Dynamic Range (HDR) Photography
HDR is an extremely sought out effect used by photographers. It allows a greater dynamic range of exposures, which is the range of values between light and dark areas, than standard digital imaging techniques or photographic methods. Actually, HDR effect is more of a post processing trick that includes overlapping the shots with the same subject in three exposure brackets (under-exposed one, normal, and over exposed), for instance. Photoshop will work fine in this case. To merge and level the photographs, one could also use special PhotoMatrix software, and then add a little bit of channel tuning and color correction. On the whole, HDR allows the photographers to more accurately represent the wide range of intensity levels found in real scenes.
High-Speed Photography
High speed photography is basically a technique of capturing pictures with a remarkably quick shutter speed. For an average everyday shooting with standard zooms, a speed over 1/20 to 1/125 second will prevent camera shake. Shutter speeds for high speed photography are much faster – as fast as 1/8000th of a second, only then a photographer starts to take advantage of the faster shutter speed’s ability to freeze action and eliminate any motion blur. While taking high speed photos, it is also necessary to have the combination of wide apertures, bright lighting conditions or an adjustment to the camera’s ISO speed. Plus the camera should have a sensor with good sensitivity and either a very good shuttering system or a very fast strobe light.

Photo by Lucky Lucas

Photo by Chaval Brasil

Photo by Dan. D.

Photo by Jens Erik Mikkelsen

Photo by markwesterman
Bokeh Photography
This technique consists in producing subjectively pleasing blur and out-of-focus areas by playing with focus and the way lens renders out-of-focus points of light. This effect usually happens to those parts of the scene that lie outside the depth of field. Photographers use a shallow focus technique to create the prominent out-of-focus background and to make the subject stand out. Bokeh is often most visible when taking a close up picture of a subject with nice clear lighting, plus it works best around small background highlights. The extent of bokeh produced in a photo depends on various depths of field, lens aberrations and shape of lens aperture, different lens designs.

Photo by Zitaaa

Photo by AHMED

Photo by cyw
Soft Focus Photography
Soft focus is produced by using a special lens that creates soft outlines in a slightly blurred image that retains sharp edges. This style is often described as a dreamy or glamorous style that’s widely used for fashion and wedding photos. Some modern cameras come with settings that let you create soft focus effects. At the same time, soft focus filters, put on front of the regular lens, are as well popular as it is more economical and flexible. It is also possible to reproduce this effect later in Photoshop, which allows adding just the right amount of soft focus effect one needs. Soft focus technique works best with a good amount of light in front of a colorful background. Some of the light is bent from the subject so it is defocused while the rest remains in focus. The highlights are actually dispersed onto adjacent areas so that the overall image still looks properly-focused, but its components are just enough out-of-focus that they are softened.

Photo by Ernie

Photo by Mat

Photo by jcoterhals
Infrared Photography
IR photography is the art of capturing invisible light, so called Infra-Red color spectrum. Now it is possible to photograph infrared light with a digital camera. Since some newer cameras have a built-in filter that prevents IR rays from coming through, you have to check if your camera can see IR light. A simple check can be made by pointing, for instance, a normal remote control to the camera, with no filter attached. If you can see the infrared glow then your camera is capable of taking IR shots. Additionally, you’ll need to buy a colored IR filter that best suited for your camera. When you place an infrared filter in front of the lens the camera simply adjusts itself to accommodate IR wavelength blocking visible light. Another piece of equipment that is crucial is the tripod to play the role of a proper stabilizer when using a slow shutter speed and long exposure necessary for taking IR photos. This technique, by the way, works best with a bright overhead sun for maximum IR reflection since it is hard to see anything when looking through IR filter. All the more, you can simulate this photography technique digitally through applying a color filter and working with Photoshop’s channel palette.
Fisheye Photography
Utilizing a circular fisheye lens with a 180° view, photographers can produce some really interesting and intriguing results with a highly unusual perspective on small or inaccessible spaces. Such ultra-wide angle allows including everything visible from a particular point in space revealing curved and distorted shapes and hemispherical relationships which are not normally conspicuous. Incredibly versatile fisheye lens was originally developed to take whole-sky pictures for meteorological research. Now it is widely used to record half a sphere with an artistic and humorous effect. Due to the unique properties of such lenses, photographers can easily capture full spherical panoramas getting everything into the frame.

Photo by 5y12u3k
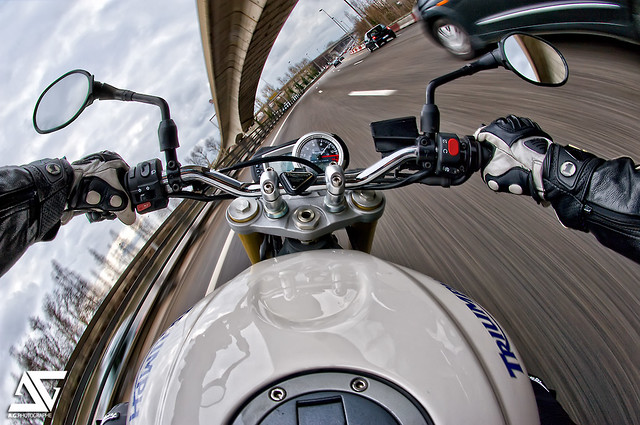
Photo by anto XIII
Pinhole Photography
This technique can go without any high-end costly equipment to get beautiful results. A pinhole camera is actually a simple camera without a lens and with a single small aperture. To produce a pinhole effect it is possible to use DSLR with some modifications (replacing camera lenses with a pinhole). The overall form is extremely simple with that tiny hole replacing a bulky lens. Light from a scene passes through this pin sized point and projects an inverted image on the opposite side of the pinhole box and the image is formed in the camera. In this case, you don’t have to worry about the focus and distortions as there are no lenses involved. The images turn out softer, with nearly infinite depth of field, and are less sharp than pictures made with a lens. The only flaw here is the greater chromatic aberration and no ability to tolerate huge enlargement. It’s noticeable that an authentic pinhole effect can be easily reproduced in Photoshop.

Photo by drizzlecombe

Photo by tearoom

Photo by gonebiking

Photo by tearoom
Burst Zoom Photography
Zoom burst is the photography effect of using slow shutter speed and a manual zoom lens to create outward blurred streaks emanating from the center, which is being the subject of focus. To make a burst zoom photo, choose a good defined object and ideally with some bright colors, then set your camera to slow shutter speed (generally under 1/60sec) and a wide aperture, and try to shoot in manual mode to execute the burst zoom. As soon as you press the shutter release button to take a photograph, either zoom in or zoom out the focus lens as the exposure is made. This will give the sense of high speed towards or from an object. Zoom burst effect can also be brought by the help of Adobe Photoshop or Photographic Filters.

Photo by bendyphotography.com
You can open up a whole new world of creative photography with the unique lomo style. Photos taken with a Lomo LC-A camera have high contrast, over-saturated twisted colors, exposure defects, light leaks, and possibly a noticeable vignette. That is what makes lomography so special. In fact, there’s something like polaroid-style instant photography. The main point is here to be quick, don’t think, and be open to the surroundings to absorb everything your eyes see. That will lead to spontaneous moments captured in a lomography photo. It is also possible to get digital images to look like lomo images. To achieve that, you can use digital SLR camera to create the photo shot and then give it the lomo vivid, surreal, and retro feel trying several different Photoshop methods.

Photo by julius68
Dave Hill Photography Technique
Dave Hill is a professional photographer who has developed a great effect for his pictures. Virtually he does beautiful work with incredible lighting to create this hyper-real, utterly stylized, painterly look. Dave Hill’s technique is currently incredibly popular, but it can be hardly reproduced by some Photoshop action or plugin. Most of the pictures made by this creative photographer involve intricate lighting setups that enhance the highlights and create rich shadows. There is a painstaking attention lent to the lighting during the shoot, plus he uses some post production to create this high-pass, cartoonish, and gritty feel photo effect. Photoshop, in this case, helps in adjusting, working with contrast, applying some color curves to eventually get somewhat more of a plastic looking HDR photo with extreme contrast and depth.
TheReviewer
August 13, 2010Wow. Quite the mix of great techniques and total crap techniques. Burried for the crap.
Jim
August 13, 2010that picture from S.F. is insane.
Patrick
August 16, 2010Wow, nice collection.
Looks like an great to-do-list for the next year of photography for me.